Air Fryer Pink Rice Balls – Crispy, Fun, and Surprisingly Easy
If you love crunchy snacks with a soft, chewy center, these Air Fryer Pink Rice Balls are going to be your new favorite. They’re playful, pretty, and ridiculously satisfying. The pink color comes from simple, natural ingredients, and the air fryer keeps everything light without deep-frying.
Great for lunch boxes, party platters, or a cozy snack night. You’ll get big flavor, a fun look, and minimal mess.

Air Fryer Pink Rice Balls – Crispy, Fun, and Surprisingly Easy
Ingredients
- Cooked short-grain rice (such as sushi rice), 3 cups, cooled
- Beet powder, 1 to 2 teaspoons (for a soft to vibrant pink) or pickled beet juice, 1 to 2 tablespoons
- Rice vinegar, 1 tablespoon
- Soy sauce or tamari, 1 tablespoon
- Sesame oil, 1 teaspoon
- Sugar or honey, 1/2 teaspoon (optional, balances tang)
- Fine salt, 1/2 teaspoon, plus more to taste
- Black pepper, a few cracks
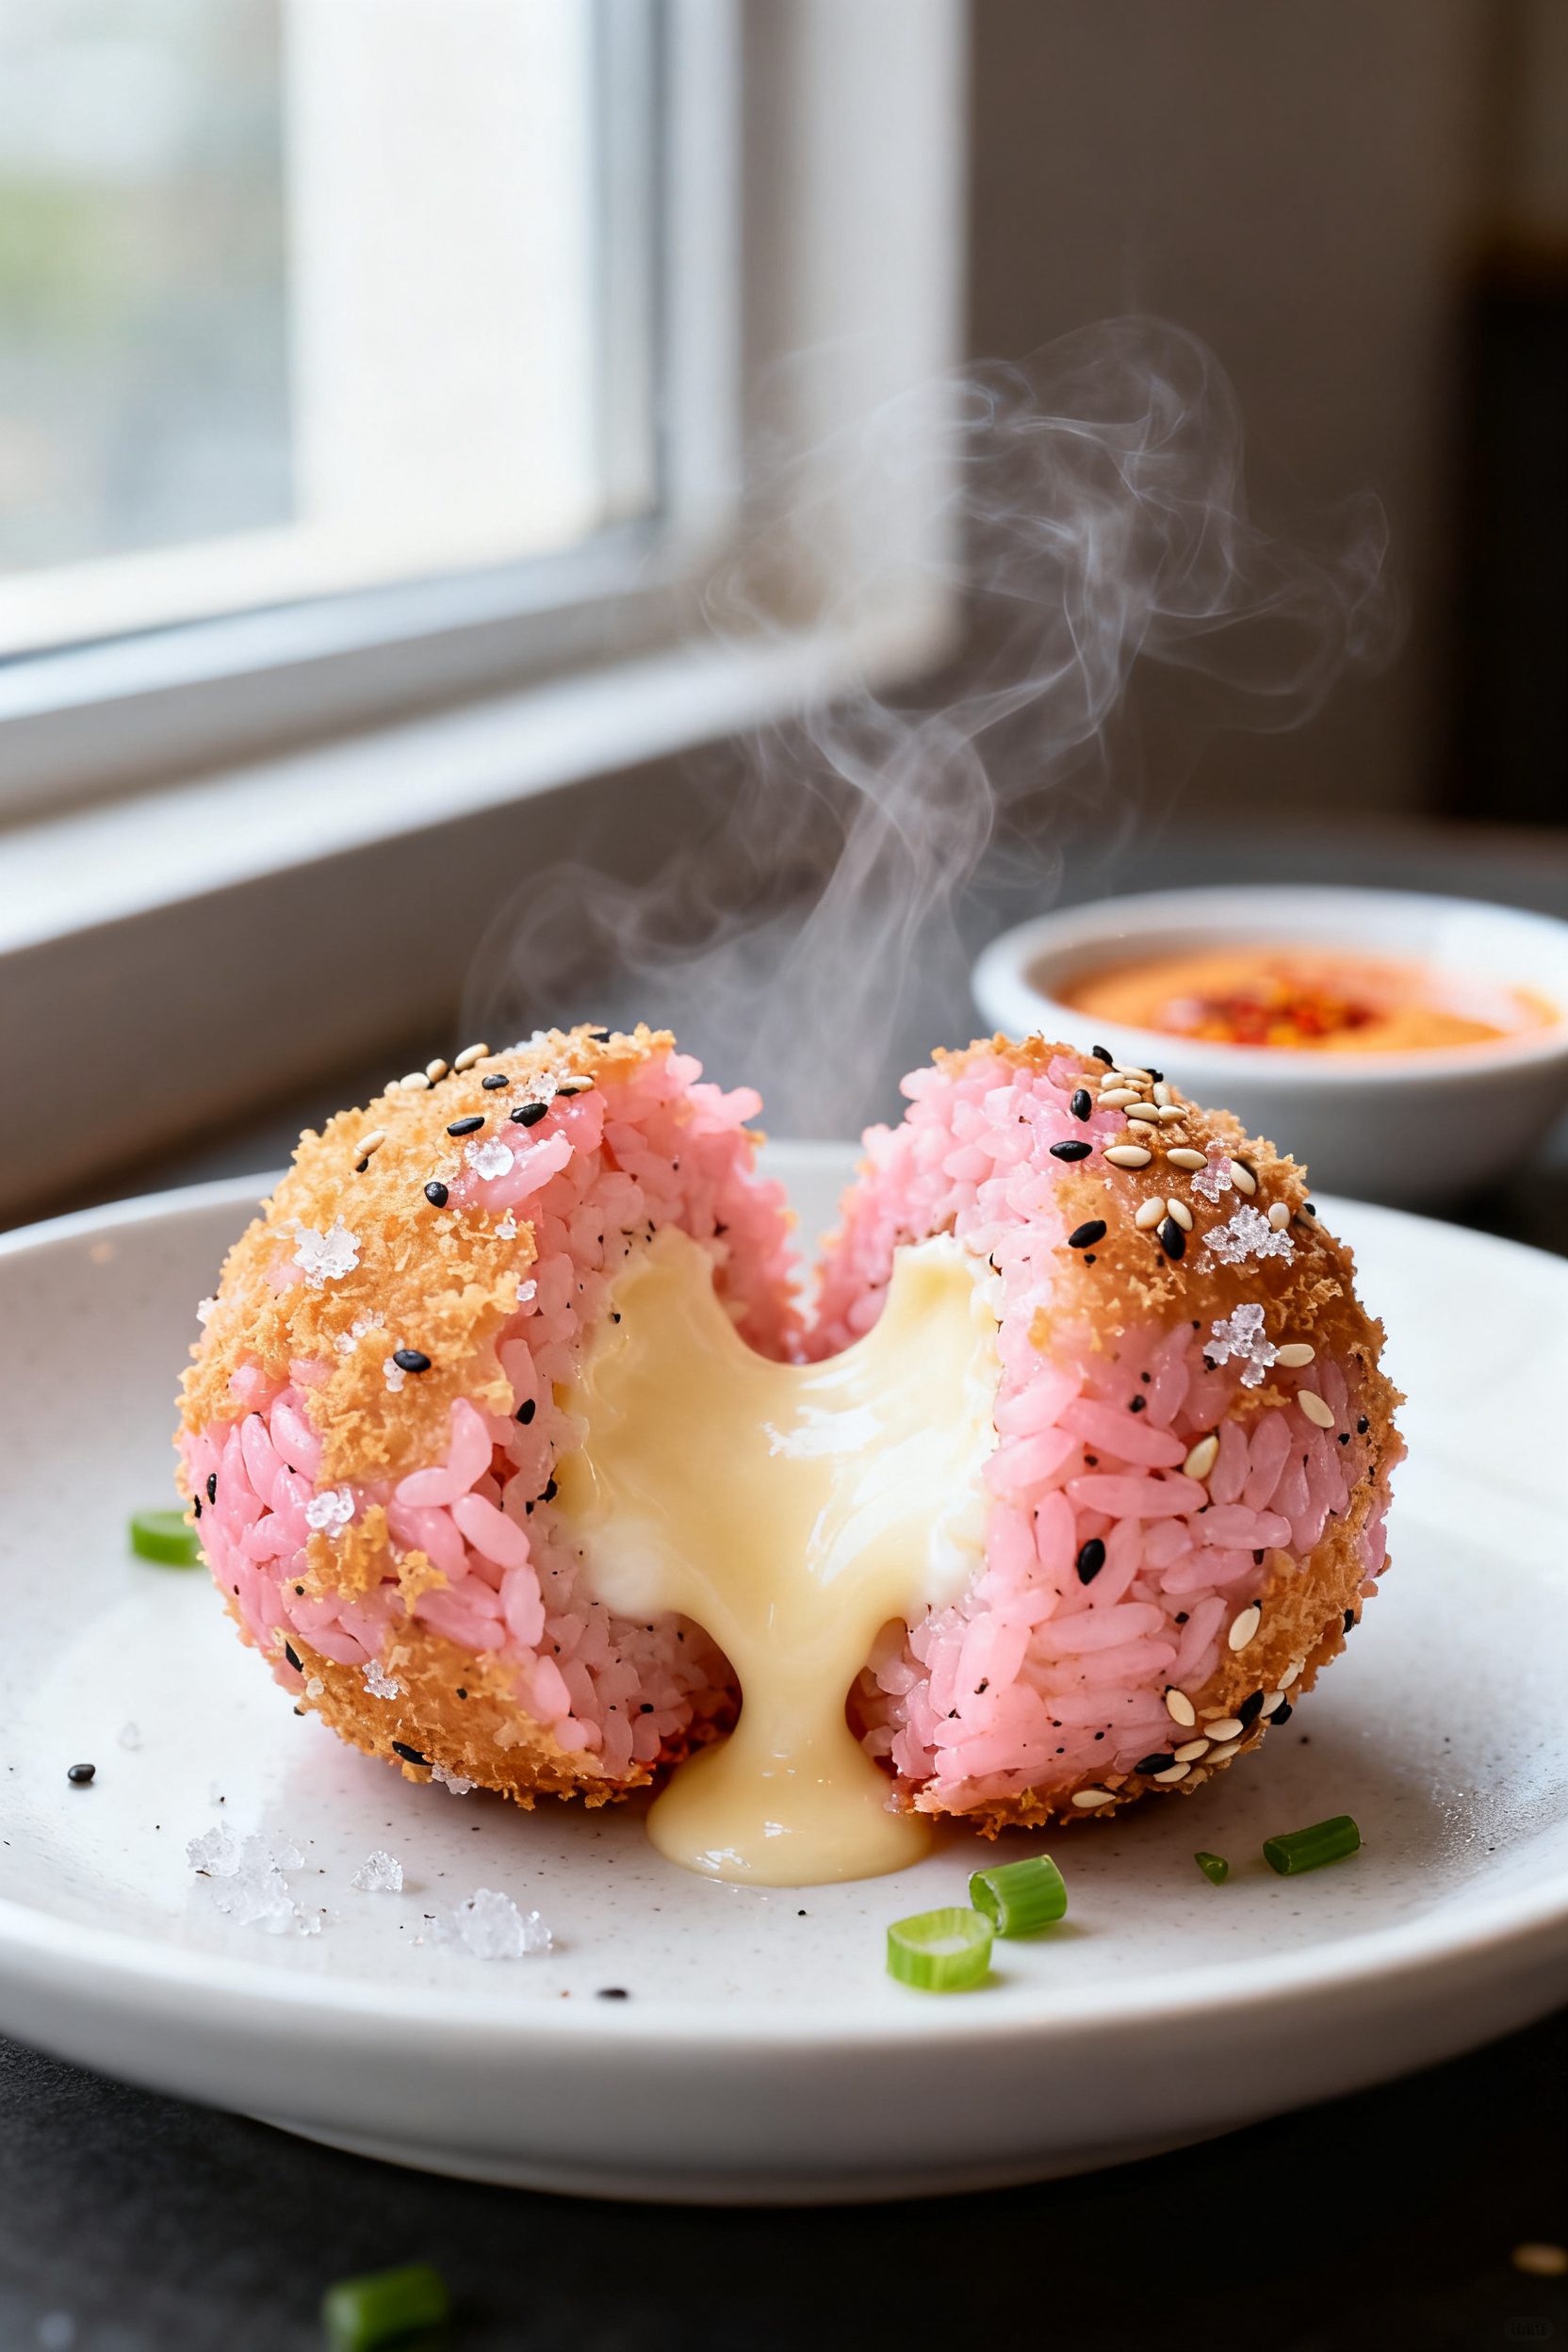
- Filling options (choose 1–2, about 3/4 cup total, finely chopped): Mozzarella or cheddar
- Canned tuna or salmon (well-drained)
- Cooked mushrooms, spinach, or edamame
- Cooked chicken, tofu, or ham
- Kimchi (squeezed dry), pickled vegetables, or scallions
- Coating: Neutral oil spray
- Optional: panko breadcrumbs (gluten-free if needed), 1 cup
- Optional: sesame seeds, 2 tablespoons
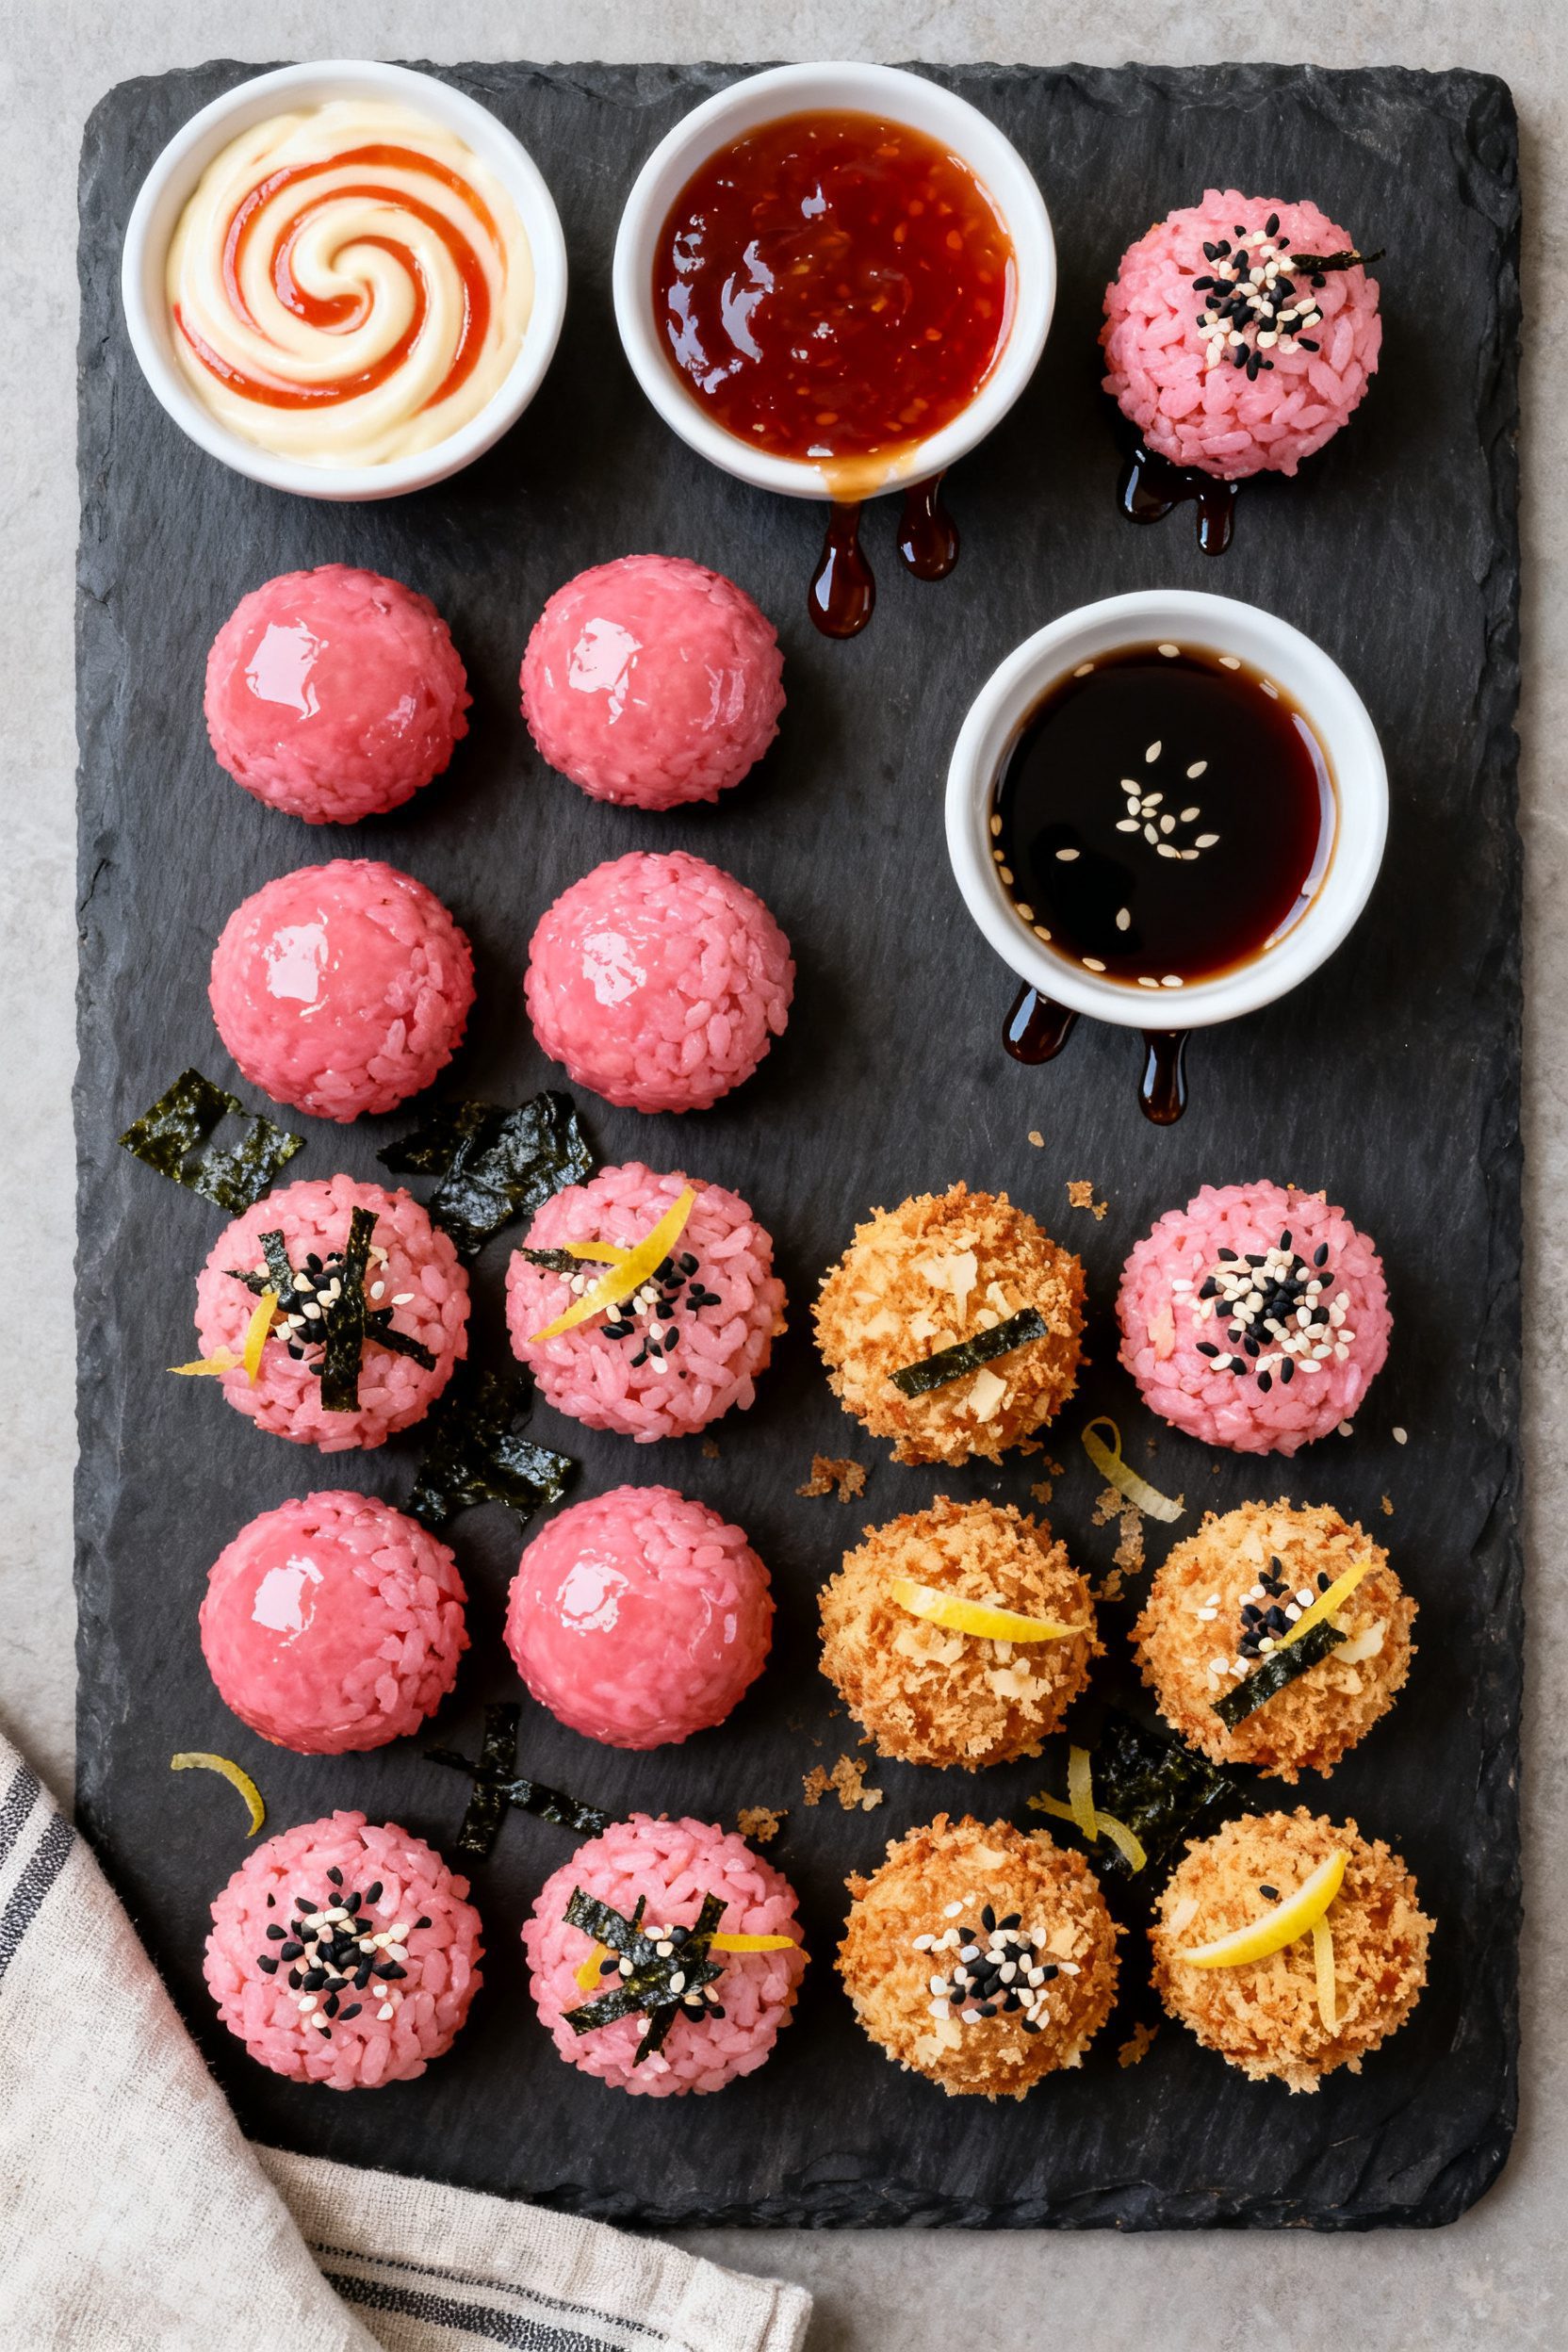
- Dipping sauces (optional): spicy mayo, soy sauce with a splash of rice vinegar, or sweet chili sauce
Instructions
- Prep the rice base. Start with cool, cooked short-grain rice. If it’s warm, let it cool to room temp so it sticks without turning mushy.
- Mix the seasoning. In a small bowl, whisk together rice vinegar, soy sauce, sesame oil, sugar or honey (if using), salt, and pepper.
- Make it pink. Sprinkle beet powder over the rice and drizzle in the seasoning. If using beet juice, add it gradually to avoid over-wetting. Gently fold until the rice turns evenly pink. Adjust color by adding a touch more beet powder or juice. Taste and tweak salt.
- Set up fillings. Prepare your choice of fillings, finely chopped and dry. Moist fillings can make the balls fall apart, so blot with paper towels if needed.
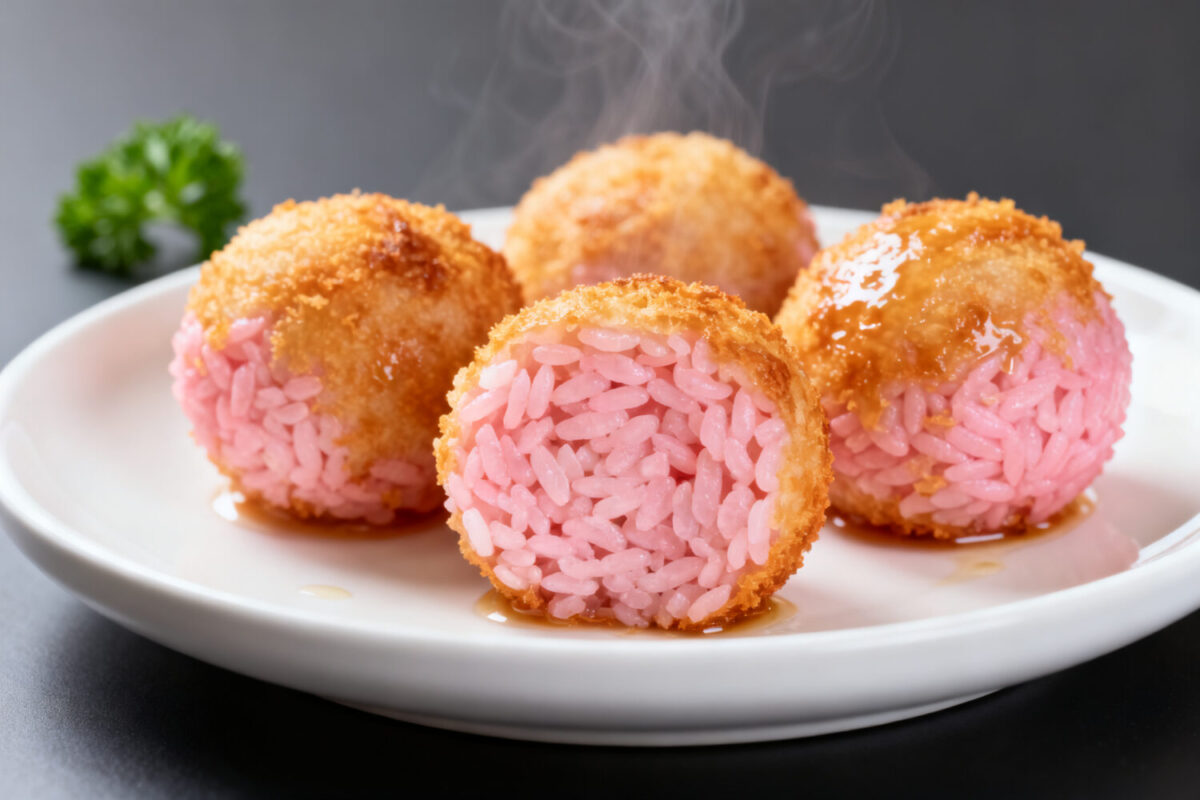
- Shape the balls. With slightly damp hands, scoop about 2 tablespoons of rice. Flatten into a small disk, add a teaspoon of filling, and press the rice around it to form a tight ball (about golf-ball size). Repeat. If skipping filling, just press firmly to compact the rice.
- Optional coating. For extra crunch, roll each ball lightly in panko mixed with sesame seeds. Press to help it stick. If the rice is too dry for coating, mist with a little water first.
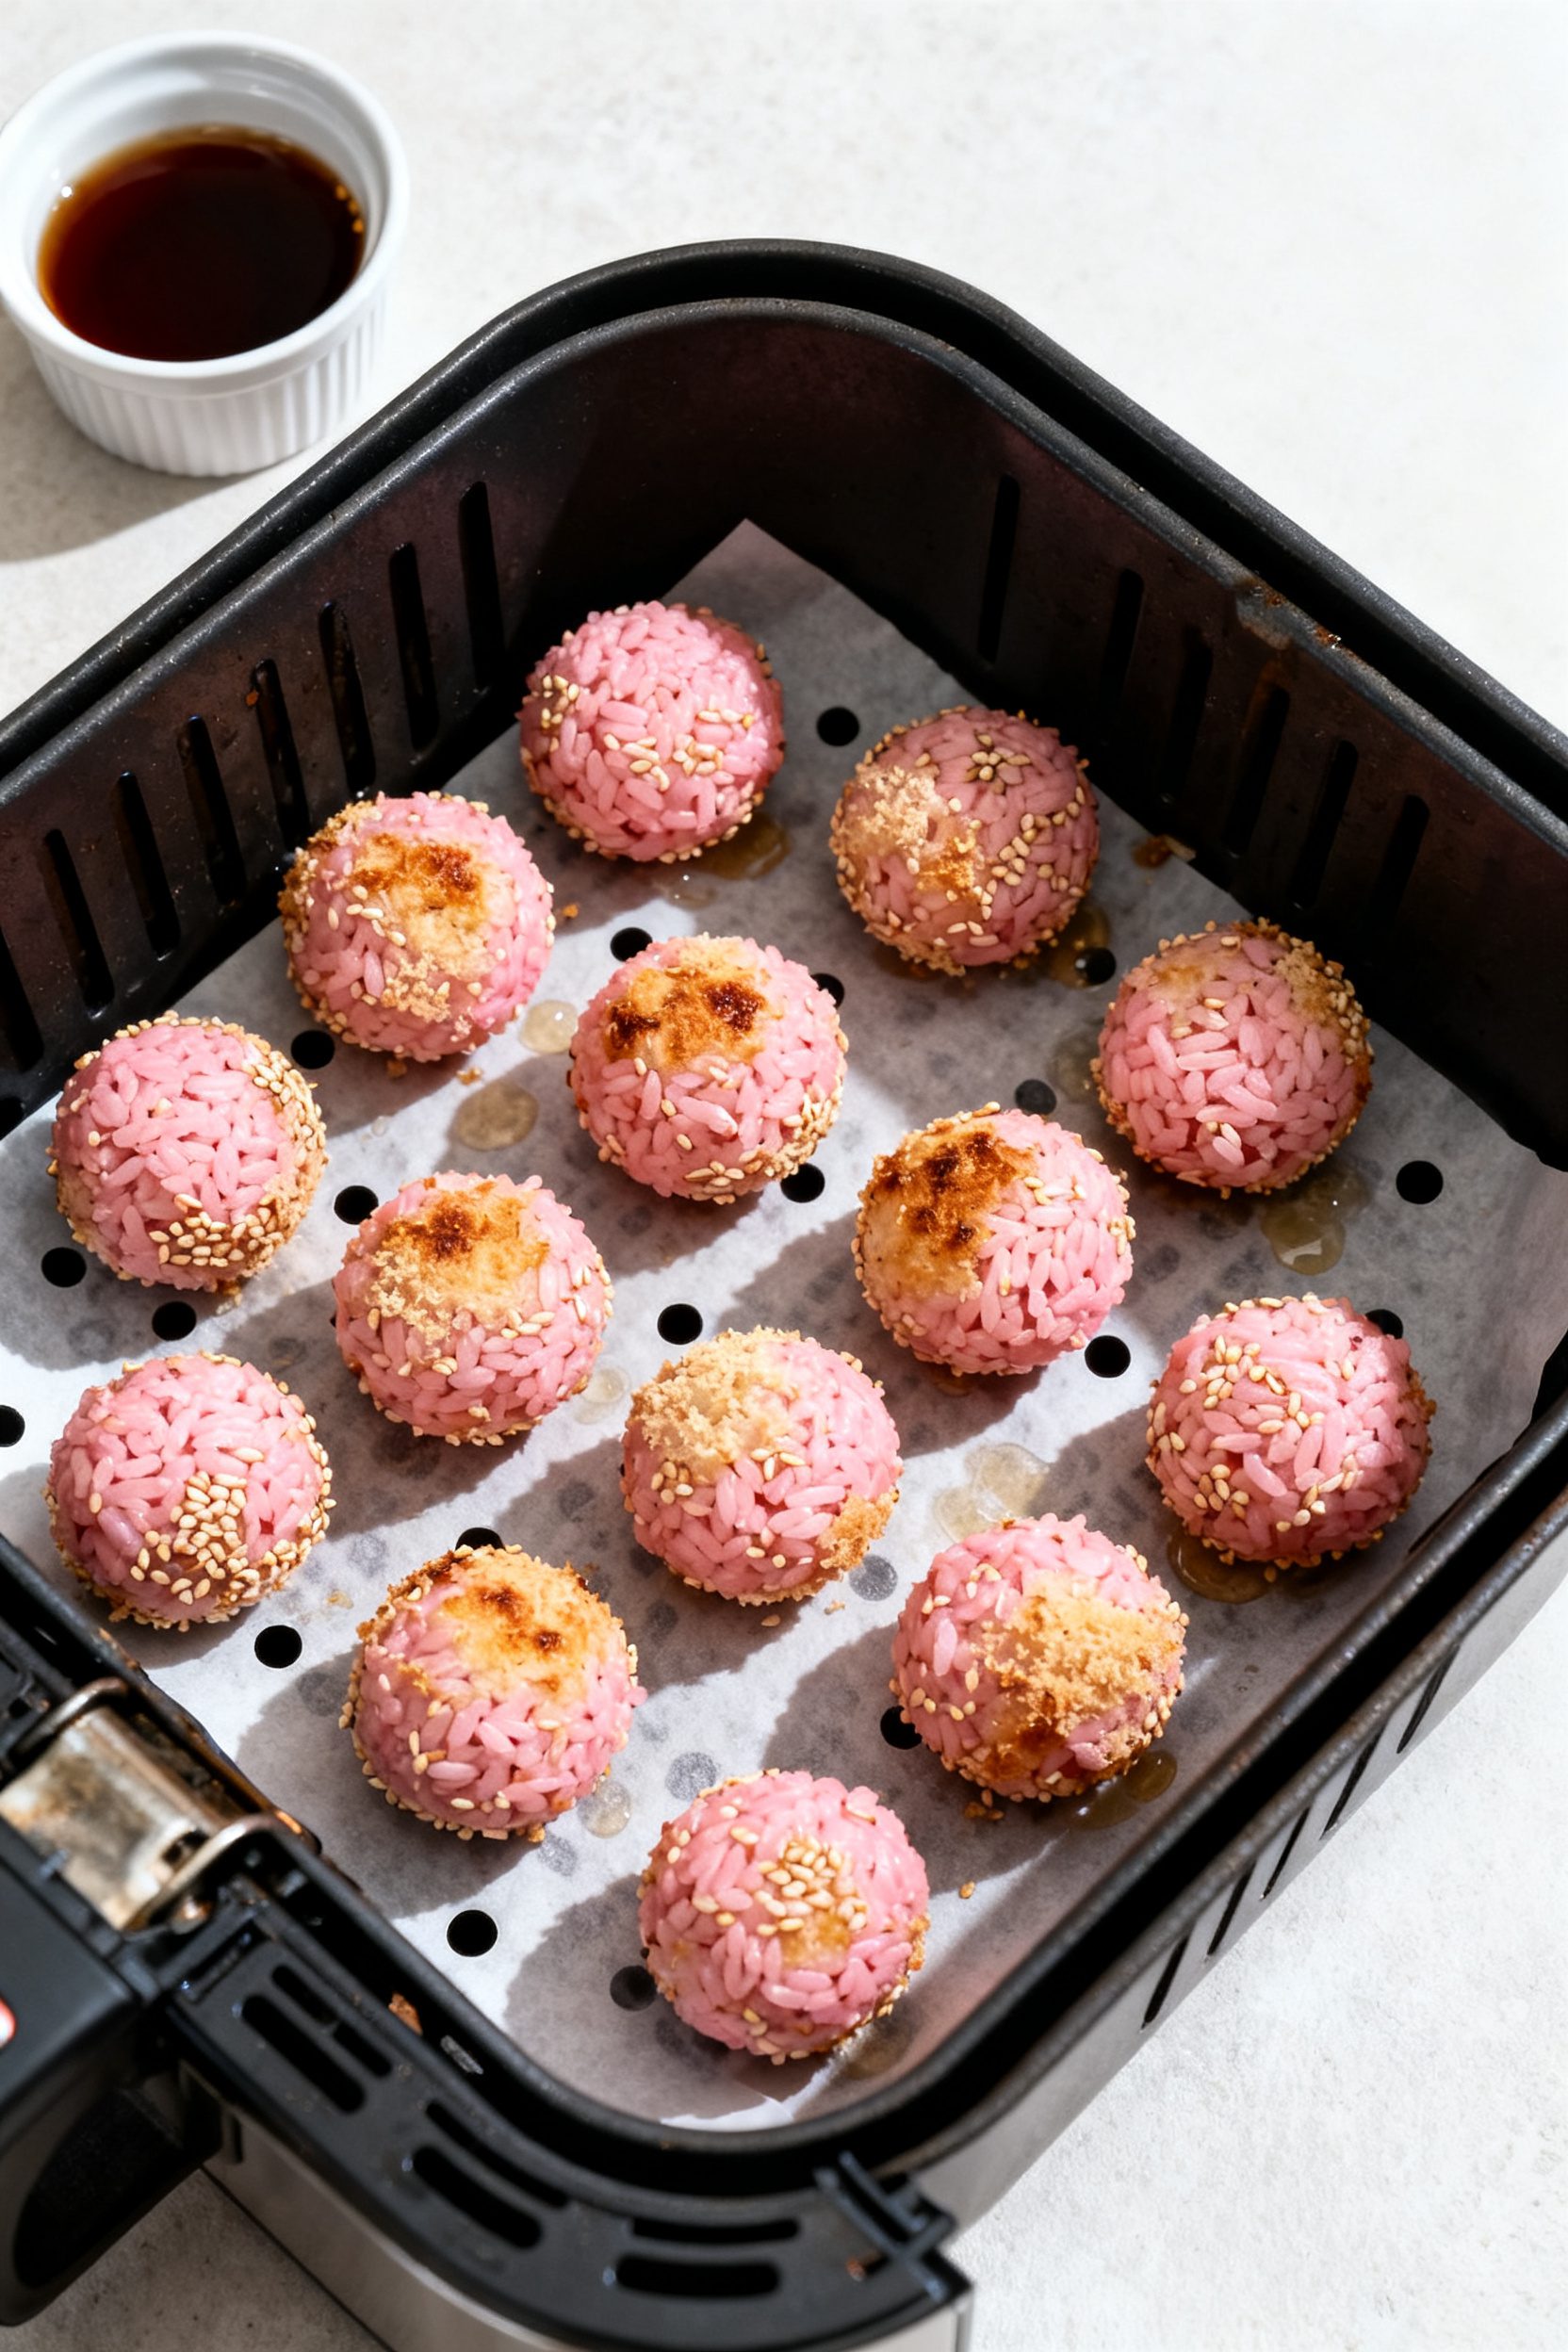
- Preheat the air fryer. Set to 375°F (190°C) for 3 minutes. Lightly oil the basket or use parchment designed for air fryers with holes.
- Air fry in batches. Arrange balls in a single layer without touching. Spray the tops with oil. Cook for 8–12 minutes, shaking or turning halfway, until crisp and lightly golden. Timing varies by size and coating.
- Season and serve. Sprinkle with a pinch of salt while hot. Serve with your favorite dipping sauces.
Why This Recipe Works
This recipe leans on short-grain rice, which turns sticky and holds its shape beautifully. The air fryer crisps the outside while keeping the center tender, so you get a perfect bite every time.
A quick beet powder or pickled beet juice tint creates that signature pink without changing the flavor much. And a little seasoning mix—savory, tangy, and slightly sweet—balances the color with real taste, not just a pretty shell.
Best of all, it’s flexible. You can keep them plain for a kid-friendly option or tuck in cheese, tuna, or veggies for extra substance.
It’s a low-fuss, high-reward snack that works hot, warm, or at room temperature.
Ingredients
- Cooked short-grain rice (such as sushi rice), 3 cups, cooled
- Beet powder, 1 to 2 teaspoons (for a soft to vibrant pink) or pickled beet juice, 1 to 2 tablespoons
- Rice vinegar, 1 tablespoon
- Soy sauce or tamari, 1 tablespoon
- Sesame oil, 1 teaspoon
- Sugar or honey, 1/2 teaspoon (optional, balances tang)
- Fine salt, 1/2 teaspoon, plus more to taste
- Black pepper, a few cracks
- Filling options (choose 1–2, about 3/4 cup total, finely chopped):
- Mozzarella or cheddar
- Canned tuna or salmon (well-drained)
- Cooked mushrooms, spinach, or edamame
- Cooked chicken, tofu, or ham
- Kimchi (squeezed dry), pickled vegetables, or scallions
- Coating:
- Neutral oil spray
- Optional: panko breadcrumbs (gluten-free if needed), 1 cup
- Optional: sesame seeds, 2 tablespoons
- Dipping sauces (optional): spicy mayo, soy sauce with a splash of rice vinegar, or sweet chili sauce
Step-by-Step Instructions
- Prep the rice base. Start with cool, cooked short-grain rice. If it’s warm, let it cool to room temp so it sticks without turning mushy.
- Mix the seasoning. In a small bowl, whisk together rice vinegar, soy sauce, sesame oil, sugar or honey (if using), salt, and pepper.
- Make it pink. Sprinkle beet powder over the rice and drizzle in the seasoning. If using beet juice, add it gradually to avoid over-wetting.
Gently fold until the rice turns evenly pink. Adjust color by adding a touch more beet powder or juice. Taste and tweak salt.
- Set up fillings. Prepare your choice of fillings, finely chopped and dry.
Moist fillings can make the balls fall apart, so blot with paper towels if needed.
- Shape the balls. With slightly damp hands, scoop about 2 tablespoons of rice. Flatten into a small disk, add a teaspoon of filling, and press the rice around it to form a tight ball (about golf-ball size). Repeat.
If skipping filling, just press firmly to compact the rice.
- Optional coating. For extra crunch, roll each ball lightly in panko mixed with sesame seeds. Press to help it stick. If the rice is too dry for coating, mist with a little water first.
- Preheat the air fryer. Set to 375°F (190°C) for 3 minutes.
Lightly oil the basket or use parchment designed for air fryers with holes.
- Air fry in batches. Arrange balls in a single layer without touching. Spray the tops with oil. Cook for 8–12 minutes, shaking or turning halfway, until crisp and lightly golden.
Timing varies by size and coating.
- Season and serve. Sprinkle with a pinch of salt while hot. Serve with your favorite dipping sauces.
How to Store
- Fridge: Cool completely, then store in an airtight container for up to 3 days. Reheat in the air fryer at 350°F (175°C) for 4–6 minutes to re-crisp.
- Freezer: Freeze on a tray until firm, then transfer to a freezer bag.
Keeps for 1 month. Air fry from frozen at 360°F (182°C) for 10–14 minutes, turning once.
- Meal prep tip: Keep the rice mixture and fillings separate in the fridge. Shape and air fry fresh for best texture.
Why This Is Good for You
- Lower oil, same crunch: Air frying gives you that fried feel with a fraction of the oil.
- Complex carbs for steady energy: Short-grain rice provides satisfying carbs for active days.
- Customizable protein and fiber: Add tuna, tofu, edamame, or veggies to boost protein and fiber without heaviness.
- Natural color: Beet powder or beet juice brings antioxidants and a playful color without artificial dyes.
What Not to Do
- Don’t use hot rice. Warm rice is too soft and sticky; it won’t hold its shape as well.
- Don’t over-wet the mix. Too much beet juice or soy sauce can make the rice loose.
Add liquids slowly.
- Don’t overload the filling. A heavy center leads to cracks. Keep it small and dry.
- Don’t crowd the basket. Air needs to circulate. Cook in batches for even browning.
- Don’t skip seasoning. Rice needs a lift.
That little mix of vinegar, soy, and sesame is key.
Recipe Variations
- Cheesy Core: Tuck in a cube of mozzarella and a pinch of black pepper. Ultra-melty and kid-approved.
- Spicy Tuna: Mix canned tuna with a little mayo, sriracha, and scallions. Keep it thick so it stays put.
- Kimchi Crunch: Finely chop drained kimchi and add sesame seeds.
Serve with gochujang mayo.
- Garlic-Butter Panko: Toss panko with a teaspoon of melted butter and garlic powder before coating.
- Vegan Veggie: Use edamame, sautéed mushrooms, and a splash of tamari. Finish with a sprinkle of nori flakes.
- Onigiri-Style: Skip panko, shape triangles, press firmly, and air fry just to set. Brush lightly with soy at the end.
- Herb & Lemon: Add lemon zest and chopped parsley to the rice.
Pair with yogurt-dill sauce.
FAQ
Can I use long-grain rice?
You can, but it won’t stick as well. Short-grain or sushi rice gives the best texture and shape. If you only have long-grain, mix in a tablespoon of cornstarch or a bit of mashed potato to help bind.
How do I keep the rice from sticking to my hands?
Lightly wet your hands or rub a drop of oil on your palms.
Re-wet as needed. This makes shaping faster and neater.
What if I don’t have beet powder or beet juice?
Use a tiny bit of red dragon fruit (pitaya) puree or pomegranate juice for color. Add slowly so you don’t water down the rice.
The flavor impact is minimal.
How big should the rice balls be?
Golf-ball size (about 1.5 inches wide) cooks evenly and holds together well. Smaller balls get crisp faster; larger ones need a few more minutes.
Why are my rice balls cracking?
The mix might be too dry, the filling too large, or you didn’t compact them enough. Add a splash of water, reduce the filling, and press firmly when shaping.
Can I bake instead of air fry?
Yes.
Bake at 400°F (205°C) on a parchment-lined sheet for 15–20 minutes, turning once and brushing with oil. They won’t be quite as evenly crisp, but still tasty.
How do I make them gluten-free?
Use tamari instead of soy sauce and gluten-free panko or skip the breadcrumb coating. Everything else here is naturally gluten-free.
What sauces pair best?
Spicy mayo, sweet chili, or a simple soy-vinegar dip are all great.
For a lighter option, try yogurt with lemon and dill.
Wrapping Up
Air Fryer Pink Rice Balls bring color, crunch, and comfort in one tidy bite. They’re easy to shape, quick to cook, and endlessly customizable. Whether you go cheesy, spicy, or veggie-loaded, the air fryer gives you a crisp shell and a tender center with almost no effort.
Keep a batch in the freezer for last-minute snacks, and you’ll always have something fun to serve. Simple ingredients, playful color, big payoff—this recipe earns a spot in your weekly rotation.